Monday, October 29, 2012

Homemade Turnip Cake

In England, Sunday roasts usually bring the family together on the day of rest.  For the Chinese overseas we like to go Yam Cha 飲茶  at the local Chinese Restaurant.  It involves the whole family spanning a few generations sitting down together to enjoy many dishes of dim sums washed down with many cups of Chinese tea.

Dims sums  點心 can range from small dishes of steamed dumplings, rice dishes, noodle dishes, fried delicacies and sweet desserts.  In our family it is not surprising to find the table filled up with food and towers of bamboo steamers of chicken feet, dumplings and buns.  It allows all the family members to catch up on the latest gossips and any important events in each others lives.

My all time favourite dim sum dish has to be the turnip cake 蘿蔔糕.  It is a savoury cake made of daikon radish and various other ingredients.  The cake is cut into small pieces which is then fried in a wok to crisp up the outer skin.  This is probably not the healthiest of dim sums on the menu but to me it is one of the yummiest.  Served with a side of chilli sauce just brings out the flavours from each ingredient in the dish.  You would not be able to eat much of this dish as it can be very rich and oily but as there are usually other dishes to choose from, it is a great starter for the meal.

Traditionally turnip cake is made during the Chinese New Year celebrations.  This dish is served when friends or family come to your home to wish you Happy Chinese New Year.

When I was younger I stayed with my maternal grandparents in Hong Kong during the New Year celebrations.  In the living room, there was always a beautiful lacquer box filled with dried fruits and melon seeds laid out for the guests to nibble when they visited.  My grandma and aunties would then fry up a plate of turnip cake and yam cake to serve afterwards.  I was never a fan of yam cake as I found it too dry but the turnip cake was moist and flavourful.  I guess I found my love of turnip cake from that young age.

My mother always said that turnip cake was very hard to make and perfect, so I never thought about making it myself.  However following a heavy weekend I was itching to go yam cha but all the family was busy, so I decided to make turnip cake at home to satisfy my urge.

My mother and future mother-in-law were great sources to ask about the recipe, but they did not mention about quantity or measurements so I estimated most of it.  I only made one cake as I had half a daikon radish in the fridge left over from making braised beef earlier in the week.  I think the next time I make it, I will double the quantities to make more so that I can freeze it for another time especially since the preparation is quite long-winded.

The recipe turned out pretty well.  As the turnip cake was home made, I was able to add in more turnip and other ingredients to make it more textured and flavoursome.  The usual turnip cakes I order from the restaurant can be mostly made of flour and skimp on the other ingredients which make it more bland.

My B who usually hates turnip cake because he finds the texture too doughy and plain, ate a plate full of my homemade turnip cake.  He liked that the homemade version had more flavour and the texture of the cake was bulked up by the dried shrimps, scallions and Chinese sausage (lap cheung).  However, next time I make it I may add less water to the mixture to thicken up the cake so that when it is fried, the shape of the cake is maintained.


Surprisingly making the turnip cake turned out very straightforward and not as complicated as my mother always made it out to be.  I wished I had made this a long time before instead of making do with the restaurant version all these years.

Homemade Turnip Cake

  • 1/2 daikon radish (about 600kg) 
  • 12 dried shrimps
  • 1 Chinese sausage
  • 2 scallions 
  • 90g rice flour
  • 20g wheat starch
  • dash of shaoxing wine 
  • 1 tsp of soy sauce
  • 1 tsp of salt
  • 1/2 tsp of white peper
  • 1tsp of sugar
  • vegetable oil
Peel and grate the radish.  Leave to drain in a colander.  Make sure to collect the juice from the radish by placing a bowl underneath the colander.  The juice is saved to be used later.

Rinse and soak the dried shrimps in a small bowl of water for an hour.  When the shrimps have softened a bit, dice it finely.  Again save the soaked water of the dried shrimps for later use.

Dice the scallions and set aside.  

Dice the Chinese sausage and set aside.


Sieve the rice flour and wheat starch into a medium sized mixing bowl. 

Combine the juice from the daikon radish and the water from the dried shrimps.  Measure out 3/4 cup of this fluid.  

Slowly add the 3/4 cup of fluid into the flour and mix to make a batter.  Set aside.


Heat up 1 tbsp of oil in a wok.  When hot stir fry the scallion and Chinese sausage.  Mix it round a bit and then add the dried shrimps.  Stir fry for about 3 minutes until the ingredients start to take on colour.


Add in the drained daikon radish and stir fry for 5 minutes.  Add in the salt, sugar, pepper, soy sauce and wine.  Keep cooking until the mixture has softened and yields less fluid.  


Finally lower the heat and add in the flour mixture.  When adding this make sure to mix this into the radish mixture thoroughly.  I found a pair of chopsticks quite useful for the job.  It takes some muscle to combine the mixtures and the mixture should resemble a sticky dough.  Turn off the heat when all is combined.


Transfer to a well oiled pan ready for steaming.  Smooth the top with a spatula for even cooking.


Steam the turnip cake for about 40 minutes.  When the turnip cake finishes cooking, it will be quite wobbly.  Let the turnip cake cool in it's pan to harden up somewhat.  It is easier to cut when cooled down.


When ready to eat, cut the turnip cake into several slices or pieces.  Heat up some oil in a wok and fry the pieces of turnip cake.  Remember to leave some room between the pieces to avoid them sticking together.  


When one side has taken up some colour, turn it over to fry the opposite side.  I like it to be extra crispy on the outside so I brown it for a bit longer.  Take care not to burn it though.  


Dish up and serve with plenty of chilli sauce.

Lemongrass Chicken Wings


Last night was a lazy day to recover from the intense weekend.  My B and I caught up on all the TV series we missed during the week and did most of the boring house chores we neglected (or put off).  We even fitted in a game of scrabble, needless to say I lost miserably.


After such a productive day we decided to treat ourselves to a yummy dinner that required little preparation.

Lemongrass chicken wings is an adaptation to the marinade my mum uses for BBQ wings in the Summer.  The lemongrass combined with other fragrant herbs and the essential garlic, ginger and chilli is out of this world! At least on this cold October evening a little something reminding us of the wonderful times we all shared in the Summer months, filled with barbecues and picnics is always a great "pick me up".


The preparation is more the chopping up of the ingredients before hand.  But if you are better equipped in the kitchen than I am, do use a mini blender to make a fragrant paste instead.

When the chicken wings are baking in the oven, the house is consumed with the warming aroma of the herbs used in the marinade.  The sticky wings are addictive, and be warned, it is very hard to stop at one or two wings.

We served this dish as a main, but it could very easily be served as a snack of some sort.  I could imagine it being served with a chilled bottle of beer whilst watching a gripping film.  Who needs popcorn when you have wings?!

Lemongrass Chicken Wings


  • 1kg chicken wings
  • 1 stalk lemongrass (remove 1st layer and mince the rest)
  • 4 cloves garlic (finely chopped)
  • 1inch piece of ginger (finely chopped)
  • 1 whole thin chilli (finely chopped)
  • 4 tbsp garlic chilli sauce
  • 1tbsp soy sauce
  • 2 tbsp runny honey
  • salt and pepper to taste


Wash the chicken wings and leave to drain.  De-joint the wings to separate the drumlettes, mid wing and wing tips.  I like eating the wing tips so I add this to the recipe, but you can discard if you don't like it (alternatively keep it to make chicken stock at a later date).  Set chicken aside.

Mix the lemongrass, garlic, ginger, chilli, garlic chilli sauce and soy sauce together in a bowl to make the marinade.  Mix this marinade in with the chicken wings and leave in the refrigerator for at least 2 hours to allow the flavours to meld together.  


Preheat the oven to 200 degrees Celsius.

After two hours put the chicken wings in a roasting dish and bake for 30 minutes.

After 30 minutes turn the chicken pieces over and drizzle the honey on top of the wings.  Bake for another 20-30 minutes, depending on the size of your wings.  


Remove from the oven once the wings are cooked (clear juices run from the meat).  Season to taste.


Serve as a main dish or snack.  


Steamed Milk Custard

I feel exhausted after a full weekend of seminars.  Saturday was very long and intense; it started at 9am and finished at 6pm, definitely much more tiring than a full working day.  By the end of the day I had a splitting headache that caused me to be bed bound for the rest of the evening.  Following a good 10 hours sleep curled in a foetal position I felt as fresh as a daisy.  The next day on Sunday was much easier as I sussed out the reason of the headache.  I was sat right on the far edge of the conference room so I had to turn my head to the left to see the projector screen.  So to avoid another nasty headache I turned my seat all the way round so that I could look directly at the screen instead of keeping my head at an angle for the whole day.  Just a little change can make such a difference.

So to reward myself for a hard working weekend I wanted something sweet but not too unhealthy.  Ice cream was out of the question as the temperature outside had dropped below 10 degrees.  So a warm dessert of some sort was needed.  A chocolate pudding was very tempting but as I'm supposed to be eating healthy to lose some weight before my wedding next year, chocolate was not the answer.  A warm bowl of custard seemed to fit the bill.


I was not craving after the traditional English custard that is runny and is eaten with some sort of crumble or  pie, but a hot steaming bowl of steamed custard that's just about sweet enough to curb my craving.  My favourite steamed custard is flavoured with ginger juice, it warms up your belly straight away.  However I did not fancy juicing a ginger for hours on my mini grater (should really invest in a juicer!).  So plain old steamed milk custard will do for now.

The hot creamy custard was not too rich and was sufficiently sweet without overpowering the flavours. As I made two bowls, my B and I devoured one big bowl straight out of the steamer and chilled the other bowl for laters after dinner.  We ate the second bowl cold and I have to say, the flavours melded together even better.  I probably prefer the steamed milk custard chilled compared to warm but both are scrummy! Give it a go, it is a very light dessert that will not disappoint and so easy to make.

Steamed Milk Custard  (serves 2-4)


  • 4 eggs (beaten)
  • 1 cup water
  • 1 cup milk
  • 100g rock sugar
Mix the beaten eggs with the milk gradually.  Set aside.


Heat up 1 cup of water in a saucepan and add the rock sugar to dissolve it.  Once dissolved, allow to cool down.


When the sugar mixture has cooled down, add it to the egg mixture.  Mix it in gradually to incorporate. Drain the mixture through a sieve to separate the impurities.  Collect the smooth custard mixture in a bowl below the sieve.  Do this slowly to avoid spillage.


Divide the mixture between 2-4 bowls (depending on size) and cover the tops of the bowls with cling film before steaming to avoid water vapour.  Steam over gentle heat in a steamer for 25 minutes until set. 


The custard can be served hot or cold.


Wednesday, October 24, 2012

Wonton Power

What is the best way to gather my dearest and nearest together and catch up?

A wonton party of course!


I know it may not sound like a blast, but in my family, anything involving food is fun. And making wontons together is the most sociable time to bring everyone together.


Usually you will see several generations of the same family sitting around the table wrapping wontons while catching up on the latest gossip.

Although I must admit it is usually the women of the family who do this.  The men are usually surrounding the TV catching up on Top Gear or in this case watching a Zombie movie.  However sometimes men can have their uses, like mincing the pork (or beating the living day lights out of the pork) with a meat cleaver for the filling of the wontons.  Somehow wielding a weapon of some sort bring out their masculinity or inner caveman ego.  Either way making wontons is a joint effort from everyone in the family.

We always make plenty so that even after the meal, everyone has a tupperware of wontons to take home with them.  Some sort of reward for their hard work or a snack for laters.


We made two versions of wontons.  One was a mixture of prawns and pork for us meat eaters and the other was purely prawn for the seafood eaters.  I have never made a vegetarian version but may be experimenting soon.

Both versions were yummy, especially when served with soup base noodles.  The ultimate comfort food: thin shrimp flavoured noodles in warming chicken soup, blanketed by a layer of wontons and veggies.  And of course no wonton noodle soup can ever be without chilli sauce/chilli oil.

I think at the meal we ate about 20 wontons each and a big bowl of noodles on top.  By the end of the meal everyone were rubbing their food baby/buddha belly with a satisfied grin on their faces.  We all had to loosen a couple of notches on our belts and run round the blocks a few times to burn off the food, but no one forgot to take their tupperware of extra wontons with them.  The suffering is so worth it!

Meaty Wonton Noodle Soup


  • 2 packs of belly pork (sliced and minced)
  • 1 pack of raw shrimps/prawns (minced)
  • 1 bunch of spring onions (finely diced)
  • small can of water chestnuts (finely diced)
  • 1 pack of shitake mushrooms (finely diced)
  • 2 eggs (beaten)
  • splash of soy sauce
  • 1 tbsp fish sauce
  • 1 tsp salt
  • 1 tsp white pepper
  • 4 packs of wonton wrappers
  • Shrimp noodles
  • Salad leaves, i.e. romaine lettuce, etc.
  • Chicken stock 
  • salt and pepper to taste
  • Plenty of chilli sauce

It is best to prepare the vegetables first to avoid cross contamination between foods.  Dice up the spring onions, shitake mushrooms and water chestnuts very finely and place in a large bowl.  

You can mince up the prawns and pork in a food blender.  Or like me do it the old fashion way with a meat cleaver.  

Slice the prawns or pork into thin slivers.  When all is sliced use the meat cleaver to pound the prawns or pork continuously until it resembles minced meat or paste.  This can take a long time and tire your forearm muscles, so best if you can find someone to share this job (in my case my B helped out).

When the prawns and meat are minced put into the large bowl along with the vegetables.  

Next add in the marinade: soy sauce, fish sauce, salt and pepper.

Pour in the beaten egg and mix all the ingredients by hand to combine all the flavours.  Make sure it is all evenly distributed.


Wrap the bowl with cling film and leave in refrigerator for at least 2 hours to chill the mixture.  


When time is up, take the bowl of wonton stuffing into the centre of the table.  

Prepare a small bowl of water to help seal the wontons.  And take out the wonton wrappers ready for wrapping.


Take one wrapper and place in the middle of one hand.  


Place a small teaspoon of stuffing into the centre of the wrapper.  


Dip one finger into the bowl of water and smear it along two edges of the wrapper.

Fold up the edges of the wrapper to resemble a triangle and press to dispel the air in the middle.


Lastly pleat the edges of the wrapper for a neater appearance.  


Place all the prepared wontons into a dish.

When all ready heat up a pan of boiling water and cook the wontons for 15 minutes.  You may need to cook in batches so not to overcrowd the pan.  When the outer skin looks less pink after 15 minutes, scoop the wontons out and place into another bowl and cover with cold water to stop the cooking process.  This stage will help the pastry wrapper to retain it's texture.


Next heat up some chicken stock in another pan for the soup base and season to taste.  Place the cooled down cooked wontons into the soup and allow to boil back up.  The soup is now ready and you can turn off the heat.


Place cooked noodles into the bottom of a noodle bowl.  Ladle over some wontons to one half of the bowl on top of the noodles.  Then place some salad leaves, such as, lettuce to the other half of the bowl.  Ladle over the chicken soup; the heat of the soup will wilt the lettuce leaves but retain it's freshness.  


Serve with plenty of chilli sauce. And now devour!


Monday, October 22, 2012

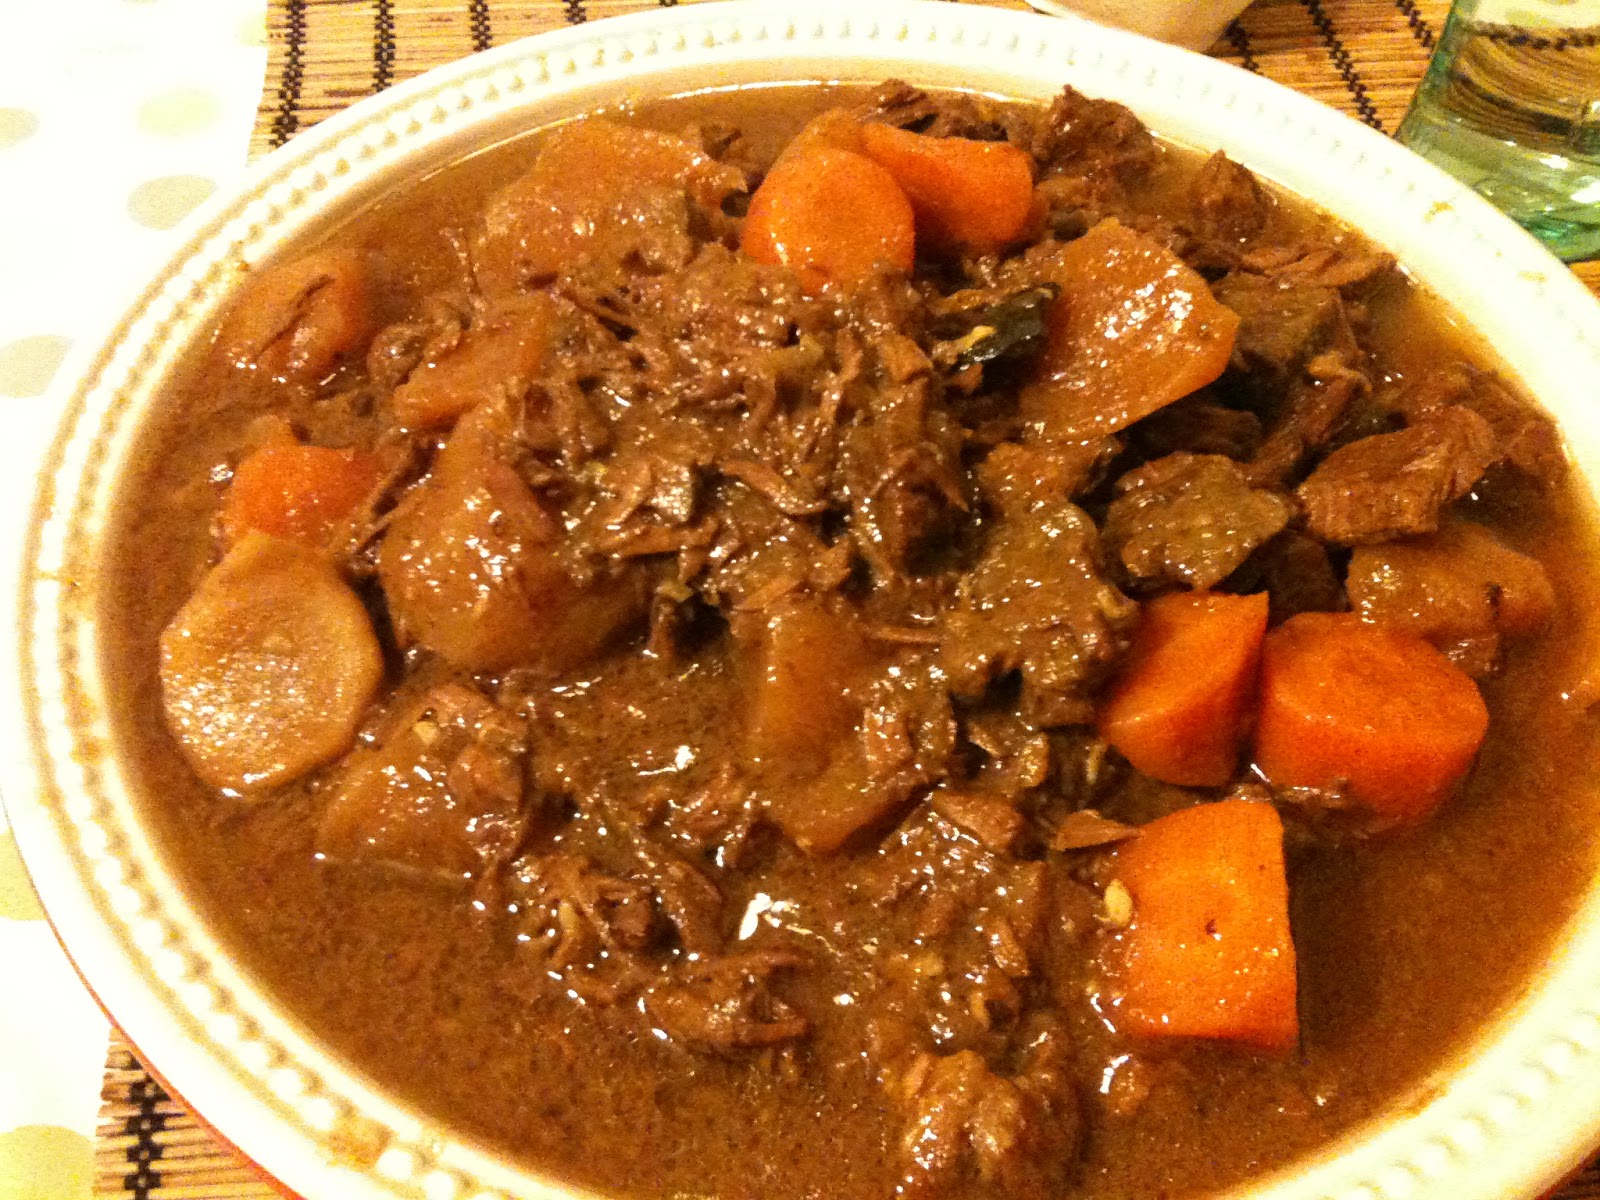
Chinese Braised Beef

Finally a weekday off!! I've been swept off my feet at work, not that I'm complaining. Especially since I am self-employed; if I don't work, I don't earn.  So what do I do on my day off?

I experiment with a new dish of course.

For two weeks, my B and I have been surviving on takeaways and microwave meals, since I finished work at 7pm everyday, I really did not fancy slaving away in the kitchen for an hour for a meal which would only last 15 minutes.

However to my amazement my B actually cooked last week, in fact twice! I was in awe with his kind gesture, as we have dated for 5 and 1/2 years, and he has only cooked twice, once was from a "Chicken Tonight" jar of sauce and the other was steak on The Lean Mean Grilling Machine.

So last week he cooked me chorizo bolognese pasta, albeit it was from a jar of Dolmio.  Even so, it was kind of a disaster for him.  He cut up one whole chilli into the sauce and to even it out, he added in two teaspoon of sugar.  Least be said, I think I managed half a bowl, if that.  It was the thought that counted!

The second meal was much more desirable.  He followed my recipe for roasted honey garlic chicken thighs.  The both of us finished 8 chicken thighs plus roast potatoes. He definitely had improved over a matter of days.

In fact I think he caught the cooking bug, as he has offered to cook me dinner tomorrow.  He was disappointed with his first attempt at the chorizo pasta, so he is determined to win me over with his second attempt tomorrow, with a few suggestions from me to tweak his recipe.

Anyways back to my day off today.  I felt like I have neglected my challenge of improving my skills as a housewife and my exploration of new and exciting recipes.

I have been craving Chinese Braised Beef since my parents Skyped me from Hong Kong about their food adventure so far.  Once they mentioned eating a bowl of Chinese Braised Beef Brisket 牛腩
 Ho Fun noodles soup, my tummy was rumbling.

I scoured the internet for blogs and recipes for Chinese Braised Beef.  I had a good idea of the ingredients already as my Dad is awesome at making this dish.

In fact as the Beef was cooking today in my kitchen, the smell wafted through the whole house.  It brought back memories of when I was younger, when we lived above a Chinese Takeaway.  Whenever my Dad cooked this dish, the smell would travel upstairs into our living quarters, and my brother and I would run downstairs to find a big vat of Braised Beef Brisket on the counter top.

It's funny how smells can conjure up distant memories you never thought you possessed or had long forgotten.

So to honour this recipe I invited my brother over to mine for dinner so we could share this memory of our childhood.  Needless to say it went down a treat; my brother devoured 3 bowls of rice just because of this dish.  I think I need to start charging him every time he comes over for dinner, or at the very least he should buy a sack of rice next time he comes over, especially the amount he eats.

Even with two eating machines (my B and my brother) at dinner tonight, I still had plenty left over.  I froze these portions for emergency rations, in case of another hectic week at work and my laziness to cook dinner.

In the traditional recipe of Chinese Braised Beef, brisket is the usual choice of cut.  The fat and tendons of the brisket gives the whole recipe a thicker and softer texture to the meat.  I couldn't find it at any of my local markets so I opted for a mix of braising steak and beef shin.


The steak did melt slightly by the time it finished cooking but was still yummy.  Due to the long cooking time it needed to braise the meat, I opted in using my trusty slow cooker.  On the plus side it meant whilst it was cooking I managed to catch up on all the TV series I missed over the last two weeks. Score!


Chinese Braised Beef


  • 1.5kg beef brisket (I used 1.2kg braising steak and 0.3g beef shin, any slow cooking cuts with some fat is fine) - cut into large chunks
  • 1/2 long turnip/daikon (peeled and cut into chunks)
  • 2 carrots (peeled and cut into chunks)
  • 4 cloves of garlic (crushed)
  • 5 slices of ginger
  • 3/4 cup shaoxing wine
  • 3 tbsp soy sauce
  • 3-4 tbsp Chu Hou sauce
  • 2 star anise
  • 1 stick cinnamon stick
  • small piece rock sugar
  • corn starch mixture (mix a little water with 1-2 tsp of corn starch until dissolved) 

Place cut turnip and carrots in the bottom of a slow cooker.  Place lid on and turn slow onto low to heat up.


Meanwhile, brown the beef chunks in some oil in a wok.  You may need to do it in batches.  When the meat is browned, put aside.  


In the same work add a little oil and fry the ginger and garlic until fragrant. 

Then add in the shaoxing wine.

When the alcohol has started to evaporate, add the beef back into the wok

Next add in the Chu Hou sauce and mix into the beef.  Add 1/1-1 cup of hot water to the mixture.

Now add the soy sauce, star anise, cinnamon stick and the rock sugar.  Mix to incorporate all the ingredients.


Once the sauce is boiling, turn off the heat and pour all the ingredients into the slow cooker.  The sauce should cover the turnip and carrots at the bottom of the slow cooker.  You can add a little more water if the sauce is not covering the vegetables.  


Turn the slow cooker to high and leave to cook for 3-4 hours.  Keep checking every hour to stir the ingredients.

After 3-4 hours, turn the slow cooker to low and cook for another hour.  


When time is up, add the corn starch mixture to the sauce and mix it in.  This should thicken the sauce slightly.  I prefer the sauce to be slightly thinner, so I can incorporate it into a bowl of plain boiled rice.


Dish up and serve.  This dish is great on just a bed of rice, or on top of a bowl of plain noodle soup.  Delish!!

Monday, October 1, 2012

Emergency dish for desperate times

Sudden onset of headaches can be a pain in the neck literally.  My headaches are usually brought on by tension arising from my neck (or cervical spine in technical jargon).  Being the weekend I could not go to see my Chiropractor for treatment, so will have to go tomorrow.  However the pain has lessened somewhat compared to this afternoon, after a nice relaxing massage from my B.

No matter how rundown I felt today I still needed to put food on the table to feed my family.  It was very tempting to just call the local take away, but considering we ate out yesterday I thought about rustling something easy yet still delicious and saving money on the way.


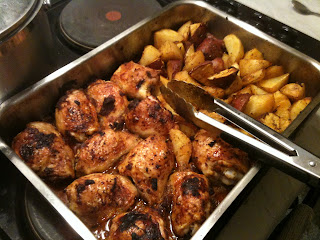
A simple Roasted Curry Chicken Thighs with Spiced Potato Wedges was called for.  It is always a big hit in the family.  Chicken thigh is definitely the choice cut in this family; as children we always fought over the chicken thighs and legs at the dinner table.  Being the older sibling, the thighs would always go to my younger brother and dinner guest.  Anyhow chicken wings was a tasty second choice.

I always have a jar of curry paste in the back of the kitchen cupboard for lazy days when a quick curry is called for.  Although today was not a day to be standing in front of the stove.  I needed a quick dish that still allowed me time to nurse my head whilst it was cooking.

The chicken thighs marinated in the curry paste gives it a great colouring and flavour that fills the whole house with a warming aroma when in the oven.  As a side dish I also cooked some potato wedges in the same roasting pan to save on washing up later.  All in all dinner took an hour to cook and less than 10-15 minutes preparation time.  The final result was sweet spicy succulent chicken thighs with a crispy skin that put a smile on everyone's faces.  Plus less stress for me meaning a fading headache.  So everybody's happy !

Roasted Curry Chicken Thighs with Spiced Potato Wedges (serves 3-4 people)

  • Pack of chicken thighs (approx 8-12 pieces)
  • 4 heaping tbsp of curry paste (we used tikka masala)
  • 4 large potatoes (we used 2 maris piper potatoes and 2 sweet potatoes)
  • 1 tsp paprika
  • 1 tsp cumin 
  • 1/2 tsp garlic powder 
  • 1 tsp dried rosemary
  • Oil spray
  • Honey
  • salt and pepper (to taste)
Preheat the oven to 200 degrees celsius. 

Place the chicken thighs in a large bowl and marinate with the curry paste.  Massage the paste into the chicken pieces and set aside.  If possible leave to marinate for a couple of hours to let the meat absorb the flavours, but if in a rush can roast immediately.  


Cut the potatoes into wedges and place in another bowl.  Sprinkle the paprika, cumin, garlic powder, rosemary, salt and pepper over the wedges and toss to cover completely.  

Place the chicken skin side down in one half of a large roasting tray and the wedges in the other half.  Alternatively you can roast the chicken and the potatoes in separate trays.  


Spray the potatoes with the oil to let it crisp up.  Put the roasting tray into the oven and roast for 30 minutes.

After the half an hour turn the chicken thighs over so that the skin is facing up.  Baste with the marinade.  Turn the wedges over with a pair of tongs.  Spray with some more oil.  Squeeze some honey over the chicken and potatoes to glaze.  Return the roasting tray to the oven and roast for another 30 minutes.  


The chicken should be cooked through and the wedges should be ready.  Check for clear juices from the chicken and soft flesh from the wedges to ensure it is fully cooked.  


Serve with a mixed salad.  Enjoy and hope you are all headache free!